I'm writing this post to show how to make a simple 2D game in Unity. I'm not the expert in Unity and I just have played around with it for 2 months so may be some of my understanding or knowledge are wrong and one more point is that I'm not the native English speaker so forgive me if I make any mistakes.
Alright, That's enough talk :). Let get into the Unity and I will introduce you how to make Gomoku game, it same as Tic tac toe but this time, we have to play in the big board and 5 in row to win, not 3 anymore.
*All scripts are written in C# but Unity also support JavaScript and Boo, so if you don't know C# but JavaScript, that's fine because they are not so different.
* If anyone have a question, feel free to ask and I will try to answer as fast as possible.
1. Require Tool:
There is only 1 thing to install is Unity, it can be downloaded by the following link:
If anyone want to build their game in the other platform like Android, iOS or Window Phone, you will need at least the sdk of that platform. You can find out the requirement for each platform on the unity website:
Download Unity and install it normally as any program on your computer. Then, create Unity account in the first time you run it.
2. Getting Started
OK, now after the Unity have been installed, we can create a new project by double click Unity icon on desktop.
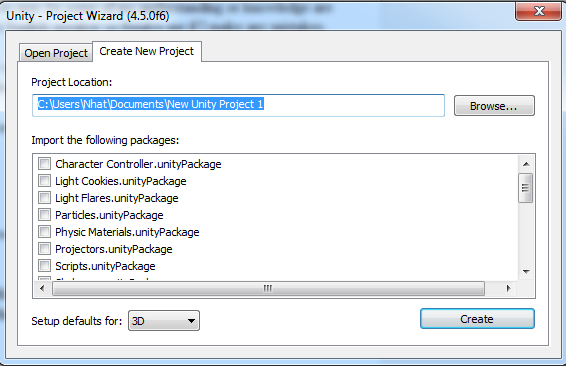
Click on Browse button to select the folder that you wish to store your project, or you can create a new folder for it. Because we do a 2D game so change the Setup defaults for: section into 2D.

The Unity will be opened after you create your project. The above image show what are basic components of Unity interface:
- Hierarchy: will let you know what object in your current game scene.
- Inspector: the components of each game object.
- Assets: Everything you create will store in this folder, such as prefab, textures, sprites, audio...
To make a new game object, Click on GameObject -> Create Empty, or you can use shortcut key Ctrl + Shift + N.

The GameObject in scene can be anything like ground, tree or player. It's up to your game but what if you want to create some object that not exist at the beginning of scene but during some specific time ?. For example, spawn player or enemy. Therefore, you must have some templates that store GameObject and then create them during the running time.
Fortunately, Unity has a Prefab asset type that allows you to store a GameObject object complete with components and properties. Based on Unity doc:
"The prefab acts as a template from which you can create new object instances in the scene. Any edits made to a prefab asset are immediately reflected in all instances produced from it but you can also override components and settings for each instance individually."

OK, I think those are some points you should notice in this tutorial. Next, we moved to make our game.
3. Coding Time
We will make the game board for Gomoku in this tutorial. The size of board is 16 x 16. There are so many way to create the board, and my solution is to create 16 x 16 objects.
Each object is a square on game board, to do this we have to draw our square image. You can do this in any drawing software. I just use paint to create my own square image by drawing the square and then re-size the image to the appropriate size. Do the same with Noughts and Crosses, below images are my drawing, use it if you want.


Now, I will explain my solution of making game board:
- We have 16 x 16 object that have a sprite is a white tile (the square image above).
- To customize and easily to control the board position, we should not put all tile in Scene Hierarchy but create one prefab then declare them in our script.
So why I don't make a prefab of Noughts and Crosses, well, I used to do it but after that I change my mind. Change sprite of current tile is faster, because I don't have to destroy the white tile and then put another tile at that position.
Alright, after you have created a white tile prefab by following the above instructions, you will create a new GameObject and name it GameSetup or whatever you like. This one will spawn tiles to create a board.
Click on GameObject in Hierarchy, then look at Inspector section, press Add Component Button -> New Script then type in GameSetup and choose Language C#.

Next, we will edit GameSetup script, right click on Game Setup (Script) -> Edit Script or double click on GameSetup in Assets section. It will now open the MonoDeveloper for editing our scripts. At this point, if anyone meets error "Assembly Load Failed" or anything similar like that, just turn off the MonoDeveloper and restart it.
So, what we have to do in GameSetup, well, there are few things in this:
- Declare the board position.
- Define the board size.
- Create a board.
This is scripts for GameSetup that I already done, click to download: GameSetup.cs

Variable

mainCam variable is used to get the convert the position from screen to position in game. For example, Screen resolution is 1280 x 720, so based on below image, we have (x', y') is pixel position but not the position of game position. The game coordinate based on the main camera of game scene.

The above image will show what I try to explain, basically, when I set the startX and startY to the position based on pixel resolution of screen, I will use the mainCam variable to convert to in-game position. It means convert (x', y') to (x'', y'').
Declare tiles variable is used to spawn the a square on board and BOARD_SIZE is board size. All the variables can be easily understood.
Function
When you create a new script, you will notice that Start () and Update () function are always in our script because our class is inherited the MonoBehaviour and Unity will put in there those basic functions. Of course, you can override the other functions from MonoBehaviour if you want.
- Start (): put variables or anything you want to initialization in the class.
- Update (): this function will be called once per frame. So we can put some logic checker or input detector in this.
You can see that I write another function called CreateBoardOffline ().
- float tileX = tiles.GetComponent<SpriteRenderer>().bounds.size.x : This means I will get the width of the sprite of a tile.
- float tileY = tiles.GetComponent<SpriteRenderer>().bounds.size.y : The same as tileX.
- float yCor = mainCam.ScreenToWorldPoint (new Vector3 (0, startY, 0f)).y: This is a reason I use main camera variable, ScreenToWorldPoint (Vector 3) will convert the paramenter to in-game positions. Return value is Vector3.
- To create a board, we will put each tile in a row then repeat until we reach the size of board. You have to do this in a loop.
for (int i = 0; i < BOARD_SIZE; i++)
{
float xCor = mainCam.ScreenToWorldPoint (new Vector3 (startX, 0, 0f)).x;
for (int j = 0; j < BOARD_SIZE; j++)
{
Vector3 tilesPos = new Vector3 (xCor, yCor, 0f);
Instantiate(tiles, tilesPos, Quaternion.identity);
xCor += tileX;
}
yCor -= tileY;
}
- I declare xCor in the first loop because after the each row complete, xCor will return to the startX position.
- xCor is increase because we need to move to next column of that row.
- After the one row have been finished, we decrease the y position, and xCor now reset to startX. It means we move the below of the current row and spawn another.
Look at this picture, it can helps you make clear about this loop.

Set Start X = 200 and Start Y = 500 or any position you want.
Drag the tiles prefab you have created above to this values.
Drag Main Camera in Hierarchy to Main Cam.
3. Result:
Finally, we have finished the script to create the Gomoku board with 16 x 16 size, press Play button or Ctrl + P and this is our result:
So this is our first tutorial of making Gomoku game and we now know how to make a board. Alright, finally I have reached the end of this tutorial, my first-ever blog because I have not done anything like this before. So don't hesitate to ask me any questions about this and as I told you, I will try to answer the questions in my time. In the next tutorial I will show everyone how to make player control.
OK, See you guys again in my next tutorial.
Shooting Casino: Play & Win Online | Shootercasino.com
ReplyDeleteShooting Casino is a fun game you can play for free in this casino. To win a slot, hold the left, หาเงินออนไลน์ and hold the right hand septcasino to 제왕카지노 win.
Lucky Club Casino Sites 2021 | Play with £10 Free Bonus
ReplyDeleteLucky Club Casino Sites 2021 | Play with £10 Free Bonus! Best Lucky Club Casino Sites 2021 | Play luckyclub with £10 Free Bonus! Best Lucky Club Casino Sites 2021 | Play with £10